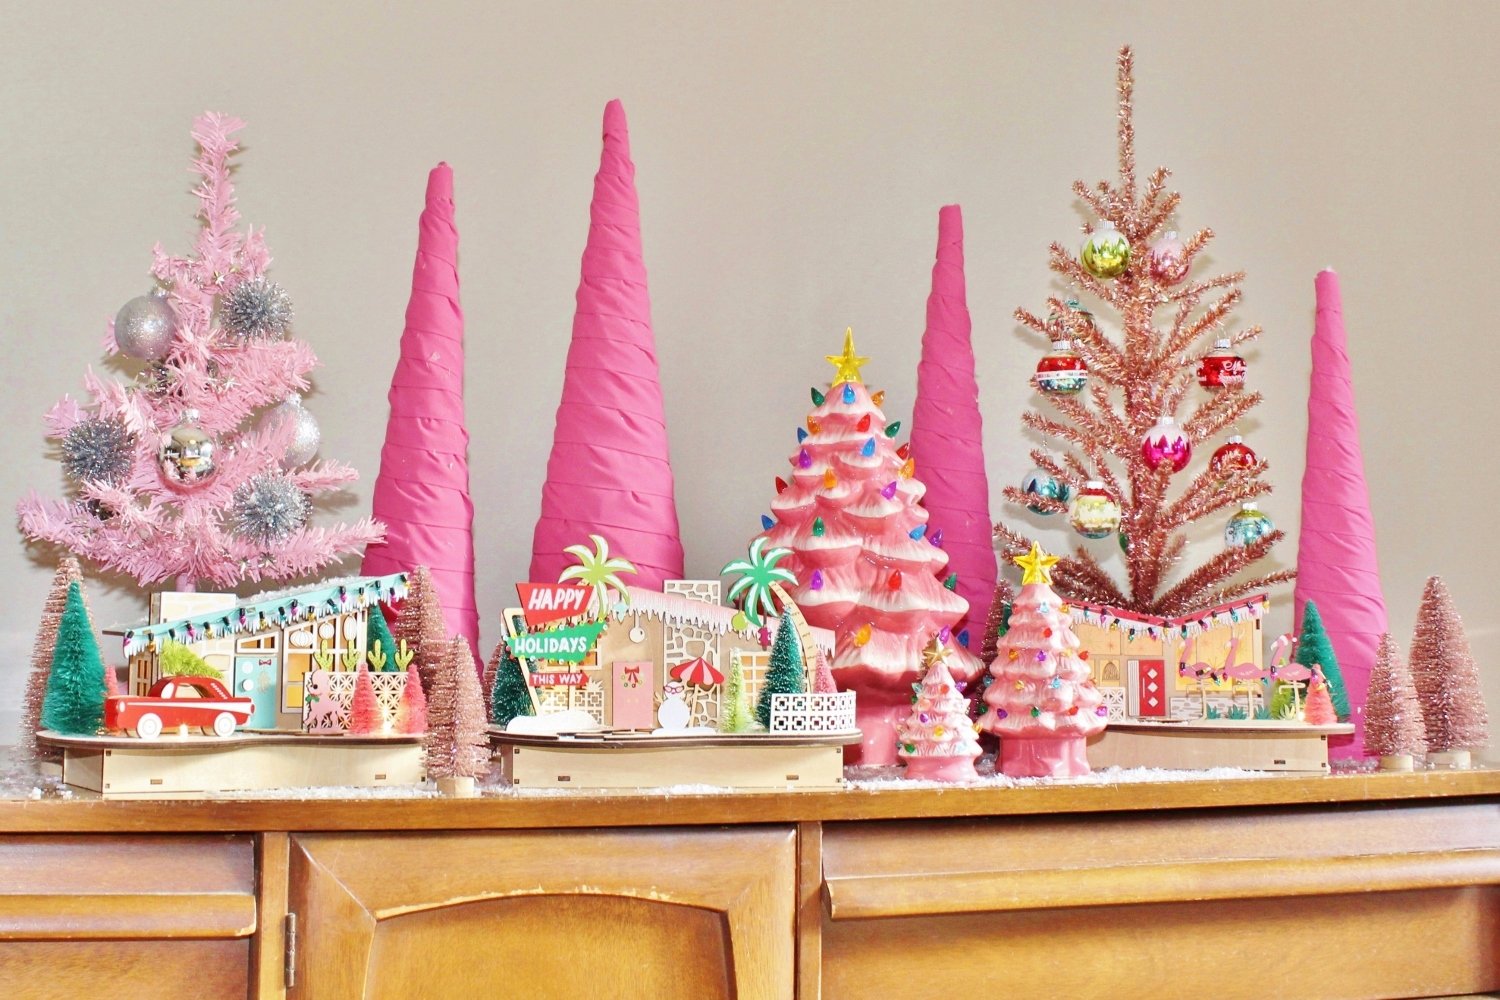
DIY Palm Springs-Inspired Midcentury Christmas Village
You guysssss! When we shared our holiday home tour the other day you got a peek at my new Palm Springs-inspired midcentury Christmas village. I’m so excited to share more because this might just be my favorite project I’ve EVER made!!! I’ve had this idea in my head for years, so it feels really great to have finally completed it and to love it as much as I dreamed I would. One of my favorite parts, though, is that I totally plan on adding on and expanding it every year, which is going to make it fun for years to come!
I love the pop of super fun color it brings to our kitchen.
Supply List
- WEN scroll saw
- hand sander (similar)
- hot glue gun (similar)
- Cricut
- 1/2-inch boards from the hardware store
- 1/32-inch bass wood sheets from the craft store
- cardstock
- craft pom poms and rick rack of various sizes
- paint — I used both paint samples and craft paint
Last year for Christmas I asked for a scroll saw. Even Andy was like, really? But yes, really! 100% because I wanted to make this project. A scroll saw is an easy, not-super-scary, not-super-expensive saw with a small blade that allows you to make detailed and curved cuts. It’s similar to a jigsaw. I don’t remember any more why I asked for a scroll saw over a jigsaw, but I think it was either because the scroll saw was cheaper or takes up less space — or maybe both reasons. (In hindsight, Andy said one of the saws we already had could have done this, too, since all I did was straight cuts on these particular houses, but I’m still happy to have this saw for future projects. Just know you don’t necessarily have to have this specific saw to do this project!)
To start, I drew out my designs, loosely based on real midcentury and Palm Springs homes, directly onto the wood. I wanted to keep the shapes as simple as possible since it was my first time using the saw, but as I get more practice, I think I’ll be able to get more detailed.
The lighting in our garage is terrible, but you get the idea.
Once the houses were cut out, I gave them a good sanding with a hand sander (for some reason I love using the hand sander!) to make sure there weren’t any splinters to catch tiny fingers that might end up playing with them. Then I planned out the details — windows and doors and, of course, pink flamingos! I wanted the houses to have some dimension, so I cut all of the windows and doors out of thin bass wood sheets from the craft store. You could also paint them on.
I used my Cricut to cut the bass wood because I wanted the cuts to be straight and even, but it’s also really easy to cut this kind of wood with regular household scissors. That’s what makes it one of my favorite things to work with. I also used the Cricut to cut out teeny tiny little pink flamingos from cardstock.
After I cut out all the pieces, I painted everything using paint samples and craft paints in fun pastel and bright colors, and glued the doors, windows, flamingos and various pom pom decorations on with hot glue.
EEEEEEKKKK! I love them so much.
In the future I imagine adding some wood palm trees and cactuses, some more houses, and getting more elaborate with my designs and decorations. But for now I’m just so happy with how my Christmas village turned out and so proud that I made it all by myself!! It’s been a loooong time since I’ve taken the time to make a project with my own hands, and it feels good.
(She’s so cute. If you saw my Instagram yesterday you know that we’ve been hit by a nasty 24-hour stomach bug. It started with Olly on Thursday night, and we were up all night with him. We thought at the time it was something he ate. But then we were up all night Monday with Joey. She almost had to go to the hospital from dehydration yesterday but had a turnaround just literally minutes before the doctor was going to make the call. Phew. It seems that she’s feeling better today.)
By the way, the fabulous ceramic Santa hat-wearing flamingo and the “Better Not Pout” signs are both from Pat Catan’s. The three triangle trees on the top shelf are also DIY projects using the same process. We actually made those trees YEARS ago, and you can see them in this old post. This year I decided to paint and decorate them.
Have you made anything lately? It feels great to create something with your own hands and I want to make myself take the time to do it more often. Tell me what you’re making!
Sorry, the comment form is closed at this time.